X
Latest Article Get our latest posts by subscribing this site

How to add custom Variable definitions to Blogger

In this post we are going learn about the CSS Variable Definitions for Colors and Fonts that could be found at the top of the style sheet of a Blogger blog. The values for the Variable definitions can be modified directly through the Blogger Template Designer where are the settings for colors, backgrounds, fonts and font sizes.

Most default Blogger templates, such as the Minima Template, use these settings for the CSS, which makes it easier to modify these variables through the Blogger dashboard, using the "Template Designer" (Template > Customize) editor and accessing to the "Advanced" section.

blogger template designer, variable definitions

If the definitions are already established in the CSS, we'll be able to change the background colors, font colors, styles or sizes, directly from our Blogger dashboard without having to touch the HTML code of our template.

If these values ​​are not set, we can define them by creating our own variables. The more variables are created, the greater will be the ease of changing colors and fonts of the Page Elements by going to the "Template Designer" and accessing the "Advanced" tab.
In some cases, we can't change the color or font of a particular template if the designer has not implemented the variables in the template and didn't defined and specified a particular value directly into a property, and if there is no definition for these values​​, we may not be able to customize it through the Blogger's Template Designer.

There are two types of variables:

1) Color Variable:
<Variable name="body.background.color" description="Outer Background" type="color" default="#66bbdd" value="#66bbdd"/>
In red is the variable name. Here you can put any name you want, however, it must not contain spaces, that's why we may see some variable names using a dot "." between each word.
In green is the description that will appear in the Fonts and Colors panel (it can contain spaces).
In blue is variable type, which in this case is "color"
In purple is the default value, which runs in the absence of any other value.
In orange is the value of the selected color.

2) Font Variable:
<Variable name="body.font" description="Font" type="font" default="normal normal 12px Arial, Tahoma, Helvetica, FreeSans, sans-serif" value="normal normal 12px Arial, Tahoma, Helvetica, FreeSans, sans-serif" />
In red the variable name without spaces.
In green the description of the variable, may contain spaces
In blue is the type of the variable, which in this case is font.
In purple the default font.
In orange is the font that you choose.

We can find the variables definitions in the <head> section of our Template by accessing the HTML code (click on the Edit HTML button). There we should see a pair of <b:skin>..</b:skin> tags. The CSS style declarations will go in between those tags, along with the variable names.

variable definitions

How to Create Variables with type Color

Now, let's see how we can create type="color" variables in our template.

Please copy the below snippet and replace the names and types as you like, then paste the code below this comment:
/* Variable definitions
   ====================
Code to copy:
 <Variable name="NAME" description="DESCRIPTION" type="color" default="#xxxxxx" value="#xxxxxx" />
For a better understanding, let's take a look at this example with variable of type "color":
<Variable name="variablecolor" description="Variable with light blue color" type="color" default="#DDF2FF" value="#DDF2FF" />
color variable type

Here I have created a variable of type "color", with the "variablecolor" name. The color values (#DDF2FF) can be applied to all the borders of my blog and whenever I want to apply color styles to a specific border, I will type it like this:
border: 1px solid $variablecolor;
Note that I have added the "$" symbol before the variable's name which should be added everytime you want to implement a new variable definition.

Once we have created the variable, we can apply it on any property (not only borders) of any selector (page element) where it is possible applying the chosen color.

For example, if I want to add this color in the main-inner background (sidebar and posts area), I will add it just after the "main-inner" class selector, like this:
.main-inner {
background-color: $variablecolor;
}
variable type color, variable definitions

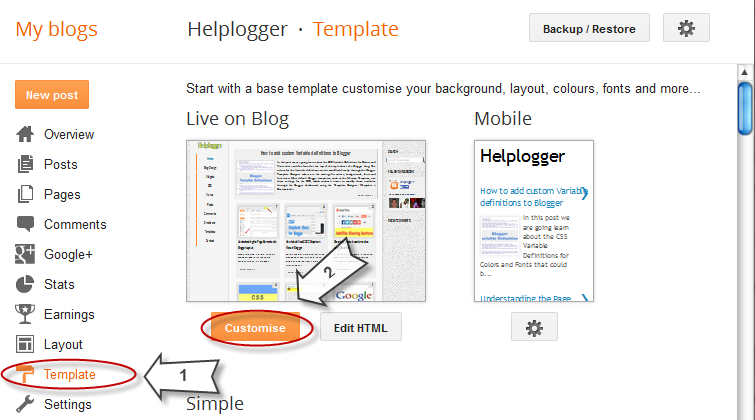
Now that a new variable has been established, save and return back to the blogger dashboard by clicking on the "Customize" button > Advanced tab. You will notice that there is a new variable called "Variable with light blue color" - to change the color, just use the color picker tool.

blogger template designer

How to Create Variables of type Font:

Now let's say I want to create a new variable of type="font" which I want to apply on the title of the sidebar gadgets. I will add it this way:
<Variable name="gadgetstitlefont" description="Gadgets Title Font" type="font" default="normal normal 16px Arial,Verdana,'Trebuchet MS',Trebuchet,Sans-serif"  value="normal normal 20px Cambria"/>
In this variable that I just created, the default font to be searched by the web browser should be Arial, and in its absence, Verdana and so on. Otherwise, apply the Cambria font which is actually the font that we want and which can be easily changed by accessing the Blogger Template Designer.

Once the font variable has been implemented, we can add it to any property of any selector where we want to define this font style.

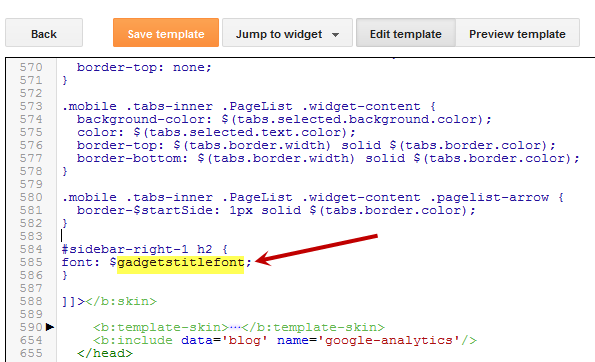
To define where this variable should be applied (which, in my example, is the title of the sidebar gadgets), I will need to include the values ​​directly in the "h2" property of the "sidebar" (sidebar-right-1) selector, by creating the following CSS rule:
#sidebar-right-1 h2 {
font: $gadgetstitlefont;
}
And I will add this above the ]]></b:skin> tag of the Template (don't forget to add the "$" symbol before the variable's name, otherwise it won't work).

variable font type

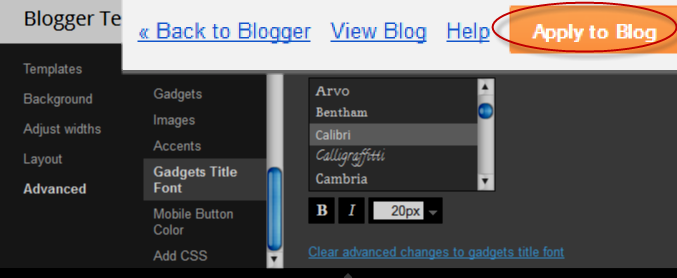
Now that we have given a new variable, Save the template and return to the Blogger dashboard by clicking on the Template > Customize button and access the Advanced tab. Scroll down and you will notice that there is a new variable named "Gadgets Title Font" - if you want to change the font type or size, you can do it directly by using this panel.

variable font type advanced

After you've decided what font style should be applied, click on the Apply to blog button on the right side.

apply to blog button

As you work on your template design, you can add lots of variables for different colors and fonts, however, for other types of CSS attributes, there's not necessary to create variables. The other types (such as margin, padding) can be included in the HTML of the template (above ]]></b:skin>) just as they normally would be.

How to Add CSS code To Blogger using Template Designer

If you are having difficulties adding the CSS codes in a Blogger template, here's a short guide that will show you a more practical and fast way to add CSS (Cascading Style Sheets) so that it will be easier for you to customize your blog.

Some readers have complained that when they had to add the CSS codes to install some feature in Blogger, they found it difficult to locate the ]]></b:skin> tag. So, I decided to make this quick tutorial to show you another way of adding the CSS without having to access the Blogger HTML editor.

Adding CSS via the Blogger Template Designer

Step 1. Log in to your Blogger account and select the blog that you want to customize.

Step 2. From the Blogger dashboard, choose "Template" and click on the "Customize" button.


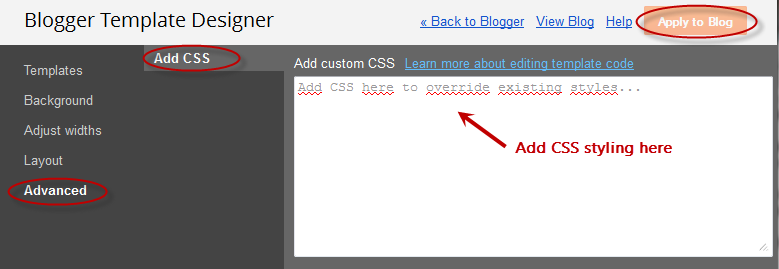
Step 3. Click on the "Advanced" tab.

Step 4. Now just add your CSS code inside the right field, located in the "Add CSS" tab (if you have more options, you may need to scroll down the list). Here you can add any CSS code when you want to apply a new style to your template.


Step 5. Once added, click on the "Apply to blog" button to save the changes.

Following this method you can't edit the existing CSS styles already added in your template, which will require to access the template's HTML and make the modifications there. Here you can only add new styles and edit the existing styles added through the Template Designer panel.

It is also important to mention that when adding the CSS styles, it isn't required to put the <style type="text/css"> ... </style> style tags, which normally would go above the </head> tag of the template html. Adding those tags may result in an error.

If you change the template, the CSS added here will be removed. The same goes for any other additions or CSS customizations made ​​through the Template HTML editor.

How to Use Cookies in Javascript


Each time we visit a website, cookies can be stored to 'remember' things that we do while browsing a page. This may happen, for example, when we visit a page where we have to login with an username and a password. In this case, after verifying that the login is correct, usually a cookie is recorded on our computer.

An example would be the popular page of Google. This search engine allows users to choose how many search results they want to see on each page. Thanks to a cookie, this configuration remains unchanged for each computer, even after rebooting several sessions. Despite this, it is good to remove them from time to time because, although, some will expire being erased automatically after a while, some of them will never do so.

Like many other things, cookies may suffer a poor use and hence their bad reputation. For instance, some websites can store and study the browsing habits of a user without their knowledge. This is why most browsers already include a system to filter them and can decide if they will provide some privacy or not.

If you want to see a live example of how a cookie works, please visit this page and refresh it a few times. You should get an alert window telling you about how many times you visited the page.
(script source: javascriptkit.com)

There could be other ways to use cookies but a server could do this with JavaScript. Below we have a simple script that can be used as many times we want, even for different purposes. Basically, what the following script does is to create three functions: the first one is to set a cookie, the second one is to read it, and the last one is to erase it. We can apply it in Blogger by accessing the template HTML and add it just before the </head> tag:
<script type='text/javascript'>
//<![CDATA[

// Set cookie
function setCookie(name, value, expires, path, domain, secure) {
document.cookie = name + "=" + escape(value) +
((expires == null) ? "" : "; expires=" + expires.toGMTString()) +
((path == null) ? "" : "; path=" + path) +
((domain == null) ? "" : "; domain=" + domain) +
((secure == null) ? "" : "; secure");
}

// Read cookie
function getCookie(name){
var cname = name + "=";
var dc = document.cookie;
if (dc.length > 0) {
begin = dc.indexOf(cname);
if (begin != -1) {
begin += cname.length;
end = dc.indexOf(";", begin);
if (end == -1) end = dc.length;
return unescape(dc.substring(begin, end));
}
}
return null;
}

//delete cookie
function eraseCookie (name,path,domain) {
if (getCookie(name)) {
document.cookie = name + "=" +
((path == null) ? "" : "; path=" + path) +
((domain == null) ? "" : "; domain=" + domain) +
"; expires=Thu, 01-Jan-70 00:00:01 GMT";
}
}

//]]>
</script>
Once done, in order to set a cookie, we only need to put the name and the value in quotes when we call the function. Additionally, we will set the expiry date by getting the current Time (in milliseconds) and add the required number of minutes (in milliseconds):
var expiration = new Date();
expiration.setTime(expiration.getTime() + 10000); //Expire after 10 seconds
setCookie("cookiename","hello",expiration);
}
The above code sets a cookie called cookiename, with the hello value and set its expiry date to 10 seconds after it has been set (10000 milliseconds = 10 seconds). If we want to restore the value of this cookie, then we should use the second function with the cookie name:
var checkCookie = getCookie("cookiename");
By adding this code below <body>, we created a cookie with the value 'hello' which can be shown on the screen if we want to. The cookie will disappear after 10 seconds:
<script type='text/javascript'>
var expiration = new Date();
expiration.setTime(expiration.getTime() + 10000);
setCookie("cookiename","hello",expiration);
var checkCookie = getCookie("cookiename");
document.write(checkCookie);
</script>
The erase function is used in the same way as the one for reading just by clicking on the name of the cookie. The setCookie values for 'domain' and 'secure' are not utilized. Use 'domain' on the Javascript cookie if you are using it on a subdomain, where the cookie is set on the widgets subdomain, but you need it to be accessible over the whole yoursite.com domain.

The combination of these three functions will allow us to handle cookies for specific purposes, as we will see in the near future.

HOW TO HAVE AN AWESOME BLOG


How to Have an Awesome Blog {Part 1}
 MM
In my humble opinion, there are FIVE things you must have in order to be a successful blogger with a substantial following.   All are equally important, and if you are lacking in even one of these areas, your blog could suffer or not grow as quickly as you’d like.

Keep in mind, these tips are for those of you who wish to have a blog with a large following and wish to perhaps make money off your blog one day. If you keep a blog as more of a journal for friends and family, more power to you!  There’s nothing wrong with that, but I aimed these tips towards bloggers who want to grow their blog quickly and possibly earn side income through it one day!


So without further ado…


To have an awesome blog, you need:


1. Great writing.  Duh? For the most part, blogging is a WRITING based media.  Sure, some folks have photo blogs or blogs that are just otherwise much more photo or video heavy, but MOST blogs are centered around writing and the way the blogger is able to weave a tale or communicate information.   Even the most mundane of lives or topics can be written about in an entertaining, humorous, or insightful way if the blogger writes truly well.  And I’m not saying this to exclude all those who weren’t born with that natural aptitude for writing, but I am saying this to insert a little dose of reality. 

Your writing is the foundation of your blog.  So brush up on your grammar skills, find a website with all the rules on punctuation, and proofread the crap out of your posts before you publish them.   If you are churning out poorly written posts, you’re turning people away.

2. Something of value. Think about your favorite blogs, especially those blogs that have reached hundreds or thousands of followers.  Why is it that you love those blogs?

I guarantee you it’s because those bloggers offer you something you find valuable.  Those bloggers don’t just ramble endlessly about the plights of their life or the awesomeness of their weekends, etc.  Or maybe they do, but if they’re doing it right, there’s something in it for the reader.  You see, I’ve noticed that all the bloggers with large followings simply offer their readers something of value.  Maybe it’s fashion tips. Maybe it’s inspiration in the form of beautiful photos or well-told stories.  Maybe it’s humor and laughter and wit.  Maybe it’s just that feeling of “hey, I can relate to her/him! I’m not alone, after all!”

Bottom line is, you have to have something your readers will find valuable and keep coming back for, or your following will not grow.  And I firmly believe that we all have something valuable to offer, if we pinpoint it and cultivate it.  It’s what I love about blogging!


3. Attractive aesthetics.  Aesthetics are the appearance of your blog—the “feel” a reader gets based on the color scheme, the fonts, the pictures, the formation of your paragraphs, and so on.  There are lots of fun ways you can customize your blog regardless of which platform you use (Blogger, Wordpress, etc), but I really can’t stress enough the importance of having your blog designed professionally.  It sounds really terrible, but I’ve actually clicked out of blogs before if they weren’t visually appealing.  To me, a blog with poor design reflects how serious the blogger is about blogging.  That may or may not be true, but I’m just saying.  You should treat your blog like a business.  If you open up a restaurant or retail store but the outside of your building is run down and shabby, people won’t want to come in, right?

A professional blog design says “I’m serious about what I’m doing and I’m willing to invest a little into making my space on the web attractive, unique, and a reflection of ME.” And a blog design does NOT have to be expensive!  I found this website to be a great starting place to look for blog designers, though many of those are little pricier. Also pay attention to the designer attributions on the sidebar or at the bottom of blogs you love. There are plenty of great ones out there. I'd also recommend going to Etsy and searching "premade blog designs." You will discover there are LOTS of great options for premade designs!

It’s just a fact of life that first impressions are EVERYTHING.  So make sure that when your readers come to your blog, they don’t have to strain to read your font color or aren’t terrified off by block upon block of straight WORDS.  Utilize white space (see how I skip a couple lines every now and then? It breaks things up  and makes paragraphs less scary).  Utilize photos (preferably really GREAT ones, and from your own life if possible [but we’ll get into that next post]).   Bottom line, make stuff pretty.  Study the blogs you love, and learn from them. 


4. A unique voice. When I first started blogging, I struggled with what “voice” I wanted to write in.  Did I want to write in a funny, witty, lighthearted way, or did I want to focus more on personal reflections and spreading inspirational messages, etc? I still haven’t really chosen between the two, but I think my readers understand that I could go either way, and it’ll still be “me.”
 
I’ve noticed that the really successful bloggers stick to one particular “voice,” and that voice is what their readers come to expect and anticipate.  There are thousands and thousands of blogs out there, so you have to ask yourself how YOURS can stand out from the crowd!  So DO study the voices other bloggers write in, experiment with your own, and find a style that is uniquely yours.


5. Time.  Now THIS is where we might lose some folks.  Seriously, even if you write like a pro on an aesthetically pleasing blog and offer readers something of value in your own unique voice, your blog’s following will STILL grow slowly if you aren’t willing or able to put TIME into networking with other bloggers and interacting with your readers.  When I first started this blog, I would spend a few hours at a time EVERY DAY visiting, commenting on, and following dozens of blogs – leaving a trail of my link all over the blogosphere.  You simply CANNOT expect people to find you if you don’t put your link out there whenever possible! (and by link, I just mean your profile – when you comment, you’re giving others the opportunity to click on your profile and find your blog!)

And if you really take the TIME to read and get to know the bloggers you’re visiting, and really take the TIME to leave thoughtful comments (i.e. NOT just one-liners!), other bloggers WILL take notice and want to come check out YOUR blog too.  And if, when they arrive at your blog, you have all of the other four items above, you will notice people beginning to read you regularly, link to you, and ask you to guest post, etc. 

You have to understand that, just like a business, you can’t expect it to thrive without putting the TIME in.  Without maintaining relationships with your new blogging friends.  Without returning comments (at least occasionally).  And as your blog’s following grows, remember that it will take MORE time to maintain relationships, answer emails, etc.  So if that isn’t what you want or  you won’t be able to handle it, you might ask yourself if a blog with a large following is really what you want! 
How to Have an Awesome Blog {Part 2}
Ok, so you think you’ve nailed the writing, the content, the aesthetics, the voice, and you’re willing to put the time in.  What else are all the awesome blogs and bloggers doing that you might not be? Are you providing your readers with the best possible experience on your blog?  Here are a few more of my suggestions I feel will make YOU a better blogger and YOUR BLOG a cooler place to hang out.

1. I beg you, PLEASE add your email address to your blogger profile! 
If you’ve never received an email in reply to a comment you’ve left on another blogger’s blog, it’s probably because you don’t have your email address associated with your Blogger profile!  A quick way to check and see if you've done this is to visit your own profile.  If you see a link that says “email” beneath your photo, you’re up and running! It should look like this…

tips1

If you DON’T see that link to your email, I PROMISE you are missing out on an awesome way to build friendships with other bloggers!  Plus, you are making it more difficult for other bloggers to quickly answer your questions or reply directly to your comments on their posts.

For example, when I get an especially nice/funny/awesome comment or if someone asks me a question, I hit “reply” straight from the email notification I receive and, if your email address has been added to your profile, my reply will come straight to your inbox.
If your email address has NOT been added to your profile, my reply will be sent into outer space, never to be seen again.  (Thankfully, once you hit “reply,” you are able to see whether or not the blogger has added their email address – if they haven’t, your message is addressed to “noreply-comment@blogger.com.”)  And that makes me sad.  And then angry. And then I get over it. 

But seriously, do it.

Go to your Blogger dashboard and click “edit profile” beside your little picture.  Then check the box next to “show my email address.”

tips1 
If you would like to use a different email address than the one shown, you can change it below under “Identity!” I suggest you use an address that doesn’t include your last name.  Create one specifically for your blog.  Ok?  Awesome.

2. PLEASE. Consider giving readers the option to listen to your music playlist (versus setting it to start automatically when someone enters your site)
There are so many reasons this is a no-no, I don’t even know where to start.

I can’t even tell you how many times I’ve been surfing blogs with my volume turned up when someone’s jam started blaring at me and almost made me pee myself in terror.  Not to mention how many times I’ve been listening to classical piano on Pandora when someone’s blog tunes started playing over my Pachabel.  How rude.

Bottom line: it’s jarring, and we don’t all have the same taste in music.  Your reader has to search for your music thingee to turn it off, then your song restarts whenever you click on the comment window (if it’s not a popup).  Then it restarts again when you submit your comment.  Then it restarts again if you click on a link in your archives, etc.  **INSERT ANGER AND MULTIPLE HEART ATTACKS.**

Again, not cool.
 
How to Have an Awesome Blog {Part 3} 

1. Use Windows Live Writer (if you have a PC).  It changed my life.

tips3

I heard something once about blog posting through Windows Live Writer, and then I realized that my laptop already had it installed (you may already have it too, or you can download it HERE if you use a PC)! And people, it will revolutionize your blogging experience.  I used to literally go stark raving mad (err, STAY stark raving mad) due to the time it took to upload pictures on Blogger and due to the way Blogger would randomly screw up all the spacing on my posts and due to the fact that Blogger just overall SUCKS!!! (yes, I am bitter.)

Then I started blogging with Windows Live Writer, and groups of pictures that might have taken 15 minutes to upload on Blogger take about 5 SECONDS on Windows Live Writer.  AND you have the option to size them to your exact specifications!!

And that’s not even going into all the other multitudes of reasons that posting blogs through Windows Live Writer is AWESOME. It is exactly like posting in Blogger, except way better.  You must try it, and you will understand.

For all you Mac-ers out there, I hear uploading pics through Photobucket or Flickr is much easier than using Blogger.  There’s a tutorial HERE. But sorry, I don’t think you can use WLW on a Mac… I guess this is the one and only thing Windows has on Apple! ;)

2. Speaking of pictures, put only the best ones on your blog (and make them as large as your template will allow).
This is so, so huge.  YES, blogging is a writing based media, but your blog will be judged as a whole package.  When you include large, clear, and good quality photos on your blog, you are drawing your readers in – in a way that not even words can do.  A picture is worth a thousand words, right? So make sure your photos aren’t shoddy and your readers don’t have to squint to see them.

Great photos add SO MUCH to a blog.  Think about your very favorite blogs, and I bet you will realize that most of those bloggers all incorporate great pictures! And NEWSFLASH: you do NOT have to have an awesome, expensive camera to take better pictures for your blog!  Any ol’ digital camera will do, and even some phone cameras take great pictures!  You just have to learn a couple excruciatingly EASY tricks regarding angles, lighting, etc, and your pictures will improve dramatically.

Just before I started getting into photography, I asked our wedding photographer for some tips, and she suggested I buy the book How to Photograph Your Life by Nick Kelsh (find it HERE – check out the used copies! I think I paid about 12 dollars for mine!).  It’s a really awesome book for beginners, even though it’s old.  The information is timeless!

3. Install Sitemeter and Google Analytics.
Both are fabulous (and FREE) tools for monitoring stats, pageviews, and even (in the case of Sitemeter) how many people are live on your blog at any given moment! Do it.  You will become obsessed.  In a good way?

4. Utilize ALL social media to help grow your blog and keep people coming back for more!
This is another big one, in my opinion.

If you aren’t using Facebook and Twitter to help bring people to your blog, you’re being silly. 

Let me explain. Specifically, let me explain the benefit of Twitter to those of you who haven’t entered the 21st century yet jumped on the Tweet Train yet.  I was against it at first, too.  And honestly, I don’t really see the purpose of Twitter unless you’re a blogger or have a business you’re trying to promote, or unless all your friends are on Twitter too.  But if you’re a blogger and not on Twitter, you’re missing out on a valuable way to drive traffic to your blog and to maintain relationships with other bloggers.

So go make a Twitter account.  Start following all your blogging friends, and some will follow you too.  Then write interesting tweets sometimes.  Then reply to other people’s tweets.  Then post a link when you publish a new blog post, and make your link sound interesting so people will want to click it.

Do the same thing on Facebook.  My blog has a Facebook page, and I post a link to the blog when I publish something new. 

It’s just marketing, people. Marketing and relationships. In the 21st century.  Get with it.
(and by the way, Twitter is not only a great marketing tool, but it’s a super fun way to get instant feedback and chat with blogging buddies.) Follow me on Twitter! (shameless plug) “Like” Story of My Life on Facebook! (another shameless plug!)

and finally…

5. Grow a thick skin. And assume there are crazies reading your blog.
Ah, yes, the crazy people.  My final piece of advice to you is to accept the fact that, as your blog’s following grows, you probably WILL encounter some crazies.  And I’m just warning you: if you give people the option to comment anonymously, they WILL.  And it’s usually not because they have something nice to say.

Just a couple short months into blogging, I received my first ugly anonymous comments, and I was horrified by it.  I removed the option to comment anonymously, but even now I still hear from some haters/people-who-fell-out-of-the-looney-bin-and-discovered-the-Internet. 
Do not respond to them.  They are people who don’t know how to create relationships through kindness, but instead just try to get a reaction and a rise out of you. Or they might just be legit insane.

But DO be very careful about the personal information you put out there.  Just because you don’t have any crazies YET doesn’t mean you never will.  Trust me on this one!

* * * * *

I sincerely hope you found all these tips helpful!  If you did, spread the word!  Let’s make the bloggy world a better place.

Do you have any other tips I missed?! Leave them in the comments!

How to Earn Money from Blogger blogs or Blogging

Earn Money from Blogging
Today I’ll teach you some easy ways to earn online money from writing free blogs. This post contains all the ways for online earning with blogs and will help you to know all the basic aspects of blogging. People think internet is a place to become rich in days without much effort but in my opinion 1st simple rule of success is hardworking with some knowledge. Following this rule blogging is not a process to become rich in days but it is a long term process. Before working online following points must be kept in mind.

You must have at least:
  • Basic computer skills.
  • Basic internet surfing knowledge.
  • You must understand and write English.

Starting a Blog at Blogger.com for Online Earning

First step is starting a free blog online. There are many online websites which offers free online blogging space. But my recommendation is at blogger.com. Due to wide range of easy and salient features of blogger.com blogs is the best free blogging platform online. 

Following points should be kept in mind before making a blog online:
  • Think of a topic to write about, something you like most or have prior knowledge about.
  • Make title of your blog and write posts about that topic (of your choice).
  • Blog style matters, make your blog look beautiful by applying blogger templates of your choice.
  • Choose attractive blogger templates at Btemplates , Deluxe Templates

Get more Traffic to your Blog by SEO 

Now that you have started writing blog of your choice. Its time to get some traffic to your blog. By traffic I mean a lot of people (like in thousands). This will lead you to a successful blogger. To get so much heavy traffic to your blog, 1st do SEO of your blog, also your blog should be a place to visit. Its style should be simple and attractive. And content on your blog should also be informative and constructive.


Put Ads on your blog to earn money online

After doing SEO and writing good content on your blog. You will need some advertising sites to put ads on your blog to earn online income. Following are some of the best publishing sites from which you can earn money by displaying their ads on your newly started low traffic blog. 
 
Visit : GeeP.in: Odia Songs | Your Link Here | Your Link Here
Copyright © 2014. Free India Tips! Daily Full Update expert Advice for your life style - All Rights Reserved
Template Created by Shary Adapted from Maskolis
Proudly powered by Blogger