X
Latest Article Get our latest posts by subscribing this site

Convert SEO Friendly Blog Post Using 6 Easy Steps

Optimizing your blog posts so that they can achieve higher search engine rankings is one of the toughest yet a simple task. If you know what you are doing then you can rank your post by doing just on-page SEO optimization.
You might already know about the various methods to generate backlinks like guest blogging and blog commenting or blogger outreach. These are all off-page SEO techniques and they help a lot but if you are generating great content then you won’t face any problems in ranking your post without any backlinks.
seo optimize blog post
In today’s article, we are going to see how you can optimize your articles by using On-page SEO techniques. There might be some techniques you already know, but I can assure you that after reading this post, you will surely learn something new.

How to Optimize Your Blog Posts?

The first thing that you need to know is that no matter how much you optimize your posts, if the content is worthless, you won’t be able to see it ranking in search engines.
So before you do anything, you should make sure that you have a superb topic for your article and amazing material and resources that you can add to support your points.
Once you have these things, writing the best content won’t be a problem.
And the second thing you need to keep in mind is that the longer the post, the better chance to rank the post in search engines.
If you don’t agree with this fact then you just need to visit Google and type in a search query and go through the first 10 results. Each and every one of them will contain more than 2000 words. If you type in any tech related or mobile related queries, you will get results that have 500 words or less but those topics won’t bring you traffic for long.
So try searching with a query like “how to start a blog” or something similar and you will see that the more detailed the article, the higher it will be ranking.
Now that you know about these things, we can get started with the article.

Use LSI Keywords

In simple SEO terms, LSI or Latent Semantic Indexing keywords means synonyms or related words.
The reason we should be using LSI keywords is that Google’s search algorithm  (ranking factors) doesn’t just look for the target keyword in your article but also looks whether you are using related keywords in your article or not.
Using target keyword at proper places is a very important thing but when you use it a lot then you might end up over-optimizing your posts which will do you no good.
But when you use LSI keywords, you are adding a superb mix of keywords to your article. This will not only keep the keyword density of your article in check but once your post ranks in search engines, it will be ranking for a several terms and not just for the target keyword.
So if you are wondering how to find LSI keyword to optimize blog posts then it’s really very simple. Just go to Google and type in the target keyword of your next post in the search bar.
Scroll down and you will see related search queries. Those are LSI keywords that you can add in your article.
google lsi keywords
There is another great tool called Ubersuggest that lists down hundreds of related keywords for you to use in your article. You can check it out because you will find hundreds of LSI keywords for almost every search term.
Or you could simply use SEOPressor plugin as it automatically shows all the related keywords right in your post editor screen making it easy for you to add variety of keywords to your post.
seopressor lsi keywords

Steps to Optimize Blog Posts

Now we are going to see the exact steps that you need to follow when writing an article to make your blog post optimized.

Step 1: Write Naturally

When you write without thinking about adding keywords, SEO, the keyword density and all that stuff, you will end up producing the best content possible. Because you are writing naturally and it will come up like you are actually talking with your readers.
But before that, there is one thing that you should do.
You should know what your target keyword is and you should come up with at least 15-20 LSI keywords. Once you have done it, try to memorize those LSI keywords and then you start writing your article.
This way, though you are not looking to add keywords, they will automatically be added in the article and you might even come up with a completely new keyword group for the article.
Also you should use formatting in your article like using bold, Italic and underline to highlight some important points will help your readers skim through the entire article and even though they didn’t read the entire article, they got everything that you wrote.
I won’t talk much about keyword density because we all know how much we should keep it. If you don’t know about it then the best keyword density would be around 1% to 3%. And this is the density of your target keyword only.

Step 2: Title Tags

When writing a really long post, you will have to break it down into sub-categories for the comfort of your readers. You don’t want them to get bored while reading your post.
To break down your content, you can use title tags in your article. The various title tags are:
  • <h1> … </h1> – Heading 1
  • <h2> … </h2> – Heading 2
  • <h3> … </h3> – Heading 3
  • Similarly up to Heading 6!
The H1 tag will be taken for your post title so if you don’t use it in your article content there won’t be a problem. I have seen some bloggers use H1 tag again inside the article, but I wouldn’t recommend otherwise.
You can use other tags – H2, H3 and H4 in your content but mostly you won’t be using H5 and H6 in your article because those are comparatively less beneficial than the first ones.
When using the title tags, you should use them in descending order which means that you should first use H2 tag before H3 tag and so on.
Even if you use H3 tag before H2, it won’t pose any major problem, but why take chance. And since H2 is more powerful than H3, you should keep it before other tags to get the maximum benefit.
The next thing is that you should add your target keyword at least once in your title tags. It should be present in your article title, which is the H1 tag and also in H2 and H3 tags.
If you are using multiple H2 and H3 tags then you can use LSI keywords for them to avoid over-optimizing your articles.

Step 3: Meta Description

The meta description is the small description that appears below your article title in search engines and play a very important role in search engine ranking.
Since we are looking to optimize blog posts for better search engine rankings, we will not avoid meta description at any cost.
When you are adding the meta description, you should be creative because you have to make it meaningful and at the same time add a target keyword and a related keyword in just 150 characters or less.
seo friendly meta description
As you can see in the above screenshot, I have added my target keyword “how to start a blog” and you can also see related keywords like “create a WordPress blog” and “how to start a blog and make money”.
I just came up with this but you can spend some minutes to make it look more professional because the better the description will be the higher your post will rank and the higher CTR you will get.

Step 4: Images

If you are writing a post with 2000 words and not adding a single image in it then you are just allowing your readers to get bored and leave your site. We don’t want that, right?
And images are not only useful to keep your readers hooked but they help a lot in the SEO score of your article.
Whenever you are uploading an image to your post, make sure that you name it properly before uploading it. I would keep the name of my image like this – “how-to-start-a-blog.jpg” rather than something like this “blog123.jpg”. And if you are uploading multiple images then use related keywords to name them.
Next you have to make sure that you add a keyword-rich ALT tag to your images. The reason why you should use ALT tags is that search engine bots can’t see images and so they look for ALT tags in your article and if it’s present then they will know that an image is present.
Since we have used a keyword-rich title for our image, we can just use that for our ALT tag as well.
  • Name of the image – “how-to-start-a-blog.jpg”
  • ALT tag – “how to start a blog”
And if you don’t know how to add ALT tag then here’s how you can do it.
In your Media uploader, when you select an image you will see some options on the right side. There you will see an option for “ALT text”. There just add your ALT tag and add it in your post.
The second way to do it is to go to the HTML section in your post editor and go to the code for your image. It will be something like this.
<img scr=http://www.yourdomain.com/wp-content/uploads/2015/02/how-to-start-a-blog.jpg” height=”xx” width=”xx” alt=”how to start a blog”>
Add the ALT tag as above at the end of the code inside the bracket.

Step 5: Internal Links

When you write any article on your blog, you should make it a habit of adding a link or two to your own existing articles. This will not only help in improving the SEO score of your blog but also will allow the crawlers to crawl all the articles on your site.
But there is one thing that you need to make sure when adding an internal link.
Just don’t add any link in your article because you have to. Add a link only when necessary. If you are writing an article on how to increase traffic then adding link to another article regarding increasing traffic or related topic like reducing bounce rate is okay but adding a link on how to install a blog in your traffic post is just not relevant.

Step 6: Outgoing Links

When you are writing an article that contains more than 2000 words, you will make some points. If you have done your research and you came up with all those points and facts on your own then that’s really awesome, but if you used an article on some other blog then you should mention it as a resource in the post.
This will do you a lot good then you expect. Your readers will start to love your articles because they will understand that you want to give them the best you can by giving the links to resources and more information.
Not only will your readers appreciate it, but the other bloggers will also appreciate it because you are sharing their links so they will surely reciprocate the gesture by mentioning you in their upcoming post or sharing your articles on social media sites.
And don’t hesitate in giving dofollow links to these resource sites as long as they are high-quality and gives more information on your post topic.

Adding an RSS feed icon to your blog, using Feedburner

Feedburner's chicklets are used to add the standard "orange radar" button to your blog.  This lets readers to subscribe the RSS feed of your choice.   The information is targeted to Blogger users, but most of it applies to anyone who uses Feedburner.


What is a Chicklet, and why you need one:


But an RSS feed is useless unless people subscribe to it.  So as well as making the feed, you also need to put something in your blog that lets your readers sign up for it.

A standard option for this is the orange square with "radar" markings on it, which many people call a "chicklet" (since it lets your viewer - the chicken? - have access to the feed you are providing).

Feedburner also has options for:
  • Using a custom icon from popular web aggregators
    I'm not sure that this is a great idea, because you don't know what feed-reader software your readers actually use, and the whole point of a feed is that you don't dictate how people see your blog.
  • Using an icon that promotes Feedburner.  This cute, but I've never seen anyone use it.

How to add a chicklet to your blog:


Log in to Feedburner, using the Google account that owns the feed.

Click on the name of the feed you want to provide a subscription tool for.

Choose the Publicize tab.

Choose the Chicklet Chooser option, from the left navigation bar.

Choose one of the options shown:  the default one is the standard-size RSS-radar-button.

Scroll to the bottom of the screen and either
  • Copy the HTML that is shown, and add it to your blog in the same way that you would add any other 3rd party HTML,

    OR  (note:  there have been some reports that the option below doesn't work any longer, as Blogger has changed but tools like Feedburner have not help up)
  • Choose Blogger from the drop down list beside "use as a widget in", and click Go

    This takes you to a Blogger screen where you can choose which blog you want to add the gadget to (if your current login has more than one), and what title to use for it. 

    When this is done, click Add Widget

    This takes you to the Design > Layout tab, where you can drag-and-drop the widget to wherever you want it.  
    (When I tried it just now, instead of the layout screen I got a "bad request" message.  However pressing Save and then View Blog brought up the blog with the gadget showing, and I was able to go back and edit the layout later on).

Help visitors who arrive at your blog via a link to a deleted post

If you sometimes delete posts from your blog, then it's a good idea to provide some help to people who who arrive at your blog via links to those posts.

(Even if you don't have any links to those posts, it's likely that a search-engine somewhere will have some - and other people may have bookmarked or shared them, too.)

There are two options for doing this:


Post-specific redirects

Use these if you want to re-direct visitors who come to a particular previous post:

Go into Settings > Search Preferences, click Edit beside Custom Redirects.


Click New Redirect, to create instructions for what to do if a visitor tries to navigate to a specific post.

Put the address of the post that you want to make a re-direct for into the From field.

Put the address of the post that you want to visitors to be taken to into the To field.
For both addresses, the part you need to enter is the URL of the post from the first backslash on.  
Do not put in your blog-address
Do include the date-part of the URL and the backslash.
eg
for    http://freeindiatips.blogspot.com/2013/01/changing-a-label-value-for-all-posts.html
use   /2013/01/changing-a-label-value-for-all-posts.html
Tick the Permanent check-box.
Click Save.
Click Save Changes.   (Yes, you need to do both Saves)


A generic page-not-found message

Use this if you do not want to set up post-specific re-directs, or if you cannot remember the URL of your deleted posts.

Go into Settings > Search Preferences, and edit the Custom Page Not Found option.

Put in some text welcoming the visitor, explaining that the page they were looking for is no longer available, and suggesting other places that they could try.

 This text can include links to other posts, so long as you hand-code them. (You might like to get code for this using the post editor).

Look at the receipients of the "registration will renew automatically in X days" email to work out your domain-administration login name

This article is about how you can work out what Google Account to use to check custom domain renewal details from the reminder emails that Google sends in the month before the domain registration expires.


Domain registration warning emails

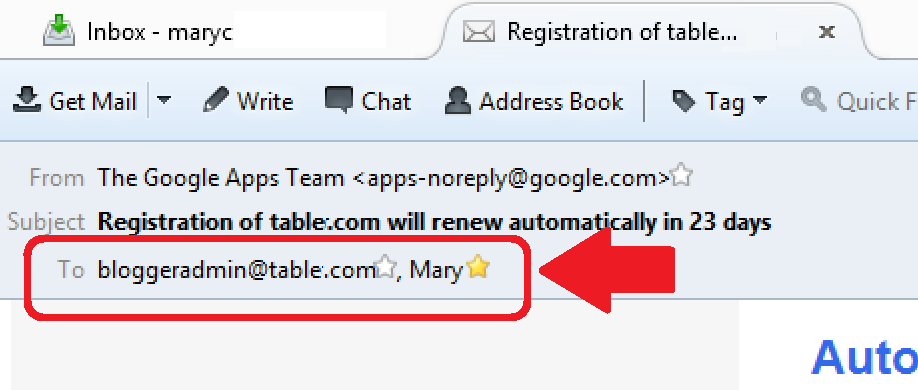
If you have a custom domain that you purchased through Blogger (when that service was available), and you have not transferred that registration to another domain registrar, then every year you will get a series of email messages like this:


The message text is:

Hello,
Your domain name, yourDomain.com, is configured for automatic renewal with registrar REGISTRAR (usually enom or goDaddy) on DATE. Each registration renewal is valid for one year.
Google will charge your account after the renewal is complete. To ensure uninterrupted service, please follow these directions to update your payment method if needed.
If you don’t want to renew your domain name and continue using Google Apps, you should turn off automatic renewal under the ‘Domain settings > Domain names’ tab in your Google Apps Admin console at http://admin.google.com.
Please do not reply to this email; replies are not monitored.


What you need to do

The specific action that you need to do varies, according to what you have set up before, and what policy changes Google may have had.
  • You may need to verify that you accept the current billing arrangements. 
  • You may need to check that the credit card which you have registered on your account is still valid (even if it was previously, it may have retired since).
  • You may even want to cancel the renewal, and thus give up the custom domain (in which case, I'd suggest re-directing your blog back to blogspot, too).


The only way to check what is required is to log on to your Google Apps Domain Administration account, and see what it tells you to do.

And pretty much the only thing you should not do is nothing:  you almost certainly either need to check your credit card, or cancel the renewal.


How to log on to your Google Apps Domain Administration account

What account to log on to

Many people say that working out what Domain Administrator account they need to log in to is difficult - and some are (mistakenly) absolutely convinced that they were able to renew previously using only the Google account that they use to manage the blog.

Unfortunately, the name of the Domain Administrator account can vary, depending on when you purchased the domain and whether or not you set up an administrator account for it at that time.

But, based on the reminder message that Google are now sending, there is a simple way to work it out:  look at the addresses that the reminder email is sent to.  What I have noticed lately is that these are:
  1. The Domain Administrator account, and 
  2. The Blogger account that set up the blog


Once you clearly understand that:
  • The Domain Administrator is not the same as your Blogger account, 
  • The Domain Administrator probably has an account-name like    bloggeradmin@YourDomain.com   or    your-admin-name@YourDomain.com

then hopefully this will be enough to help you understand which account you need to use.


Then log on - adding the account to your list

Click on the link in the email, which will take you to the Google Apps Admin console ie http://admin.google.com
Most likely, the Domain Administrator account that you worked out above will not be in the list of accounts that Google knows about on your PC (for a range of reasons - including that this is probably an account that you only use once per year).  So you need to use the Add Account button at the bottom of the list ( you may need to scroll down to reach it).
Enter your full Domain Administrator account name    eg   bloggeradmin@YourDomain.com
Either enter your password, or click the Need Help / I don't know my password options to get Google to help you with the password.    
Click Sign In


... and then follow the steps in the screens that Google presents to set up your billing and / overify your credit card.

Add floating social media sharing buttons below Blogger post titles

It is becoming increasingly important to make our posts appreciated and shared on social networks and one of the best ways to get traffic to our blog/website and boost sharing stats is to add social sharing buttons.

In this tutorial we will see how to add a floating social media sharing bar below the title of Blogger posts, so when a reader scrolls down the page, he will still be able to see the sharing buttons without having to scroll back to the top.Adding the below jQuery script will make the buttons float in a fixed position as soon as they reach "the top" of the page. By scrolling back, the buttons will return to their initial position.

The social sharing bar includes buttons for Facebook, Twitter, Google+, and Pinterest.

Adding the social media sharing buttons below every Blogger post title


Step 1. From the Blogger Dashboard, go to Template and click on the Edit HTML button:


Step 2. Click anywhere inside the code area and type the </head> tag inside the search box.

Step 3. Just above </head> add this script:
<script src='http://ajax.googleapis.com/ajax/libs/jquery/1.7.1/jquery.min.js' type='text/javascript'/>

<script type='text/javascript'>
//<![CDATA[
$(function() {
var $movesbuttons = $("#floating-social-buttons"),
$window = $(window),
offset = $movesbuttons.offset();
$window.scroll(function() {
if ($window.scrollTop() > offset.top) {
$movesbuttons.css({'position' : 'fixed', 'width' : '550px', 'top' : '0px'});
} else {
$movesbuttons.css({'position' : 'absolute', 'top' : 'auto'});
}
});
});
//]]>
</script>
Step 4. Now before ]]></b:skin> add the following CSS styles:
#floating-social-buttons {
padding: 6px 0px 12px;
position: absolute;
background: #F6F6F6;
border-bottom: 1px solid #DEDEDE;
width: 550px;
height: 18px;
z-index: 99;
}
.floating-social-buttons {
margin-left: 5px !important;
}
.floating-social-buttons li {
float: left;
margin-left: 5px;
list-style:none;
}
To change the width of the bar, modify the 550px values in red. Note that this value also appears in the script which also needs to be modified.

Step 5. Finally, just below the second <div class='post-header'> (press CTRL + F and hit Enter twice to find the second one) add the following code:
<b:if cond='data:blog.pageType == &quot;item&quot;'>
<div style='padding:5px 0 35px 0;clear:both;'>
<div id='floating-social-buttons'>
<ul class='floating-social-buttons'>

<li><iframe allowTransparency='true' expr:src='&quot;http://www.facebook.com/plugins/like.php?href=&quot; + data:post.url+ &quot;&amp;layout=button_count&amp;show_faces=false&amp;width=100&amp;height=25&amp;action=like&amp;font=tahoma&amp;colorscheme=light&quot;' frameborder='0' scrolling='no' style='border:none; overflow:hidden; width:100px; height:25px;'/></li>

<li><a class='twitter-share-button' data-lang='en' href='https://twitter.com/share'>Tweet</a><script src='//platform.twitter.com/widgets.js' type='text/javascript'/></li>

<li><script src='http://apis.google.com/js/plusone.js' type='text/javascript'/><g:plusone expr:href='data:post.url' size='medium'/></li>

<li><a class='pin-it-button' count-layout='horizontal' expr:href='&quot;http://pinterest.com/pin/create/button/?url=&quot; + data:post.url + &quot;&amp;media=&quot; + data:post.thumbnailUrl + &quot;&amp;description=&quot; + data:post.snippet' style='margin:0 10px 5px 0;'>Pin It</a> <script src='http://assets.pinterest.com/js/pinit.js' type='text/javascript'/></li>

</ul>
</div>
</div>
</b:if>
Customization:

If you want the buttons appear at the end of the post, paste this code before or after <div class='post-footer'>
If the bar overlaps with the post content, then change 35px to a higher value.

Step 6. Click on the Save template button... and that's it!

So these were the steps for adding the horizontal social buttons bar on Blogger. I highly recommend using this bar as it could really help you to get more social traffic for your blog.

The difference between white hat SEO and black hat SEO

The search engine optimization (SEO) is a good chance to promote your blog on Google search results and other search engines. For those who don't understand how SEO works, I've posted some articles on this blog that may help, but it's important to understand that there are good and bad techniques that could have a direct impact on your ranking. So, in this post I'll talk about the terms known to those who are familiar with SEO - the black and white hat - and we will get to know what's good and what is not when we think about optimizing our website and its content.

black hat and white hat, seo techniques

What is black hat seo?

From the 'SEO dictionary', the term black hat has to do with the abusive techniques that will force the search engines to look at a specific site and rank it. This might work at first, but the algorithms can already see some of these techniques that have become common for a fast result.

Such practices to trick the search engines are, for example, the excessive use of keywords, especially in headings and subheadings; transparent keywords to the user - the so-called hidden text, automatically generated content, pages redirecting automatically to other content and more.

What is white hat seo?

The white hat has to do with the good techniques in the 'eyes' of search engines. These are considered ethical techniques for the ranking, helping, thus, the positioning of a website or blog. However, working the white hat is a process that requires dedication and results may take longer to appear (this is why so many people opt for black hat in order to 'try' something more 'effective') but the results could be much more stable and satisfactory.

Keep in mind that Google has good tricks up its sleeve to penalize anyone who doesn't act in accordance with the policies and rules of their website - this includes removing your page from any of the positions. Fair enough, after all, why Google would 'reward' somebody with the top spot if he doesn't provide good content for his users and, at the same time, doesn't meet the requirements of the algorithm?

For those who are interested and want to stay on top of Google search results, visit this webmaster guidelines page. There, you can find further information about how to create a good content, how the design of your blog/site should be and how to work with your links. There you can also find mentions about black hat techniques.

PageRank Checker - Check Your Google Page Rank

PageRank is an algorithm used by Google Search to rank websites in their search engine results. PageRank was named after Larry Page, one of the founders of Google. PageRank is a way of measuring the importance of website pages. According to Google:
"PageRank works by counting the number and quality of links to a page to determine a rough estimate of how important the website is. The underlying assumption is that more important websites are likely to receive more links from other websites."

Source: Wikipedia

Briefly, the PageRank is an assessment of the importance of a web page. This relevance is calculated and published on a scale from 0 to 10. Google basically takes into account the number of links that each page receives, however, it's no use getting any links, it is important that these links are from quality sites which are related to your links, preferably internal links. A greater importance has the quantity of internal links, linked by other websites, which happens when you create a post and someone publishes the link that redirects to this posting that you created. Therefore, the more links your blog or site has, the higher is the probability of having a good PageRank.

Now that you understand what PageRank is, how about checking yours?

You can easily calculate your PageRank and verify the importance of your page.
Just enter the address of your website / blog below and check it out:
Check Page Rank of your Web site pages instantly:
This page rank checking tool is powered by Page Rank Checker service
In case you want to add a button to your blog to promote your PageRank, please visit this page: PageRank Buttons

Add Author's Profile Picture and Name in Multi Author Blog

In this tutorial we will see how to add a photo next to the name of the author just below the post title. This feature can be used on Blogger blogs that have not only one author but also on blogs with multiple authors, so the info for each of the publisher will be shown below the titles of their respective posts and this way, they will get the proper credit for their work.

I strongly recommend to make a backup of your template before making any changes.

Adding the Author's Profile Picture / Avatar and Name in Blogger


Step 1. From the Blogger Dashboard, go to Template and click on the Edit HTML button.


Step 2. Click anywhere inside the code area and press the CTRL + F keys to open the search box.
Paste the following code inside the search box and hit Enter to find it:
<span class='post-author vcard'>
Just below this line, you should see the rest of code which should look something like this:
              <span class='post-author vcard'>
                <b:if cond='data:top.showAuthor'>
                  <b:if cond='data:post.authorProfileUrl'>
                    <span class='fn' itemprop='author' itemscope='itemscope' itemtype='http://schema.org/Person'>
                      <meta expr:content='data:post.authorProfileUrl' itemprop='url'/>
                      <a expr:href='data:post.authorProfileUrl' rel='author' title='author profile'>
                        <span itemprop='name'><data:post.author/></span>
                      </a>
                    </span>
                  <b:else/>
                    <span class='fn' itemprop='author' itemscope='itemscope' itemtype='http://schema.org/Person'>
                      <span itemprop='name'><data:post.author/></span>
                    </span>
                  </b:if>
                </b:if>
</span>
Note: If you are using a modified template, it could look something like this:
<span class='post-author vcard'>
<b:if cond='data:top.showAuthor'>
<data:top.authorLabel/>
<span class='fn'><data:post.author/>
</span>
</b:if>
</span>
Step 3. Now that you found the code, delete it. Pay attention that it should start and end with the tags marked in yellow. This code is repeated two times, so you need to replace it two times.

Step 4. Next, search for this line (you'll find it twice and you should stop at the second one):
<div class='post-header-line-1'/>
Step 5. Just below it, paste the following code:
<span class='post-author vcard'>
<b:if cond='data:post.author == &quot;AuthorName&quot;'>
<span class='author'><a href='Author-Profile-URL'><img src='Author-Image-URL'/></a></span>
</b:if>
        <b:if cond='data:top.showAuthor'>
          <data:top.authorLabel/>
            <b:if cond='data:post.authorProfileUrl'>
              <span class='fn'>
                <a expr:href='data:post.authorProfileUrl' itemprop='author' rel='author' title='author profile'>
                  <data:post.author/>
                </a>
              </span>
            <b:else/>
              <span class='fn'><data:post.author/></span>
            </b:if>
        </b:if>
      </span>
Replace the AuthorName text with the EXACT name that appears on the Blogger profile, i.e., the one that appears in the posts or comments. If it is added in a different way, Blogger will not recognize the username, nor the image and the code will not work. To display the author's pic, add the URL of the author's Blogger profile and the image URL by replacing the text in blue. I recommend you to use an image with a maximum height of 40px and 40px wide.
Once done, the photo of the author should appear next to the "posted by" text just below the post title.

If you have a blog with more than one author, add a code like the one below, just above <b:if cond='data:top.showAuthor'>
<b:if cond='data:post.author == &quot;AuthorName2&quot;'>
<span class='author'><a href='Author2-Profile-URL'><img src='Author2-Image-URL'/></a></span>
</b:if>
If you have more than two authors, repeat this block of code for each author that you want to add.

Step 6. Now let's go ahead and add the CSS styles - search for the ]]></b:skin> tag and just above it, paste the following code:
.author img{
float: left;
border: 1px solid #FFFFFF;
border-radius: 5px;
box-shadow: 0 1px 2px rgba(0, 0, 0, 0.4);
margin: 0px 5px 10px 0px;
width:35px;
height:35px;
}
.post-author{
color:#777;
font-size: 13px;
}
.post-author a {
color:#777;
margin-top: 10px;
}
... to change the size of avatar, increase/decrease the 35px values.

Step 7. Click on the Save template button and now you should see the profile picture and name of the Blogger author below the title of each post.

CSS3 Transition Property Basics

You can see on various blogs an interesting effect on some links. Most of the time, when you hover over a link, something changes in its style: it will either change its color or background or will become underlined. What about this cool effect that consists in gradual transition from one style to another, as you can see in this demo below:
Hover Over Me!

This transition is achieved by using the CSS3 transition property - property which is supported in all major browsers like Chrome, Firefox, Opera, Safari (for Safari we will need the -webkit- prefix to get this effect).

The CSS3 Transition Syntax

The syntax of the transition supports four values:
- the property affected by the transition, such as color, border, background, width, etc.
- the duration of this transition in seconds, i.e., how long it will take to change your style completely
- the delay time for the transition to be executed, also in seconds, i.e., how long it takes for the transition to start when the mouse hovers over that element;

Check out the code below:
.example {
 transition-property: width; /* property that undergoes a transition */
 transition-duration: 2s; /* duration of the transition */
 transition-timing-function: linear; /* timing-function */
 transition-delay: 0; /* length of time to delay the start of a transition */
/* now we will repeat the entire declaration with the -webkit- prefix for the effect to work in Chrome and Safari */
 -webkit-transition-property: width;
 -webkit-transition-duration: 2s;
 -webkit-transition-timing-function: linear;
 -webkit-transition-delay: 0;
}
In the example above, the elements with the class .example will become wide within two seconds as the mouse passes over them.

When we define the style of a link, usually we need to use the a:link selector, and when defining the style when the mouse is over the link, we need to use the :hover selector. However, the transition can be used in any HTML element, not just links. To make the transition effect to work properly, we should define two blocks of style for that element, i.e. the normal style for a tag/id/class and the style on mouse :hover for a specific tag/id/class.

For example:
tag, #id, .class {
/* insert here the styles that you want for the selector */
/* insert below the transition effects */

}
tag:hover, #id:hover, class:hover {
/* Insert here the styles for when the mouse is over the element */
/* here it is not necessary to repeat the declaration of the transition */

}
You can add the same style on multiple selectors separated by commas as I have done above, although that's not necessary.

Below are some transition examples with their respective codes.

I will not use the transition-timing-function in these examples because it makes no difference, as the first value is the duration in seconds and the second is the delay.

Example 1

Transition example

/* with a single property */
#example1 {
 background-color: #FFFF00;
-moz-transition-property: background-color;
-moz-transition-duration: 2s;
-webkit-transition-property: background-color;
-webkit-transition-duration: 2s;
-o-transition-property: background-color;
-o-transition-duration: 2s;
}
#example1:hover {
background-color: #B5E2FF;
}

Example 2

Transition example

/* with four properties and delay */
#example2 {
background-color: #9c3;
border: 8px solid #690;
padding: 20px;
color: #fff;
-moz-transition-property: background-color,border;
-moz-transition-duration: 1s;
-webkit-transition-property: background-color,border;
-webkit-transition-duration: 1s;
-o-transition-property: background-color,border;
-o-transition-duration: 1s;
}
#example2:hover {
background-color: #690;
border: 8px dashed #fff;
color: #FFFF00;
-moz-transition-property: background-color,border;
-moz-transition-duration: 2s;
-webkit-transition-property: background-color,border;
-webkit-transition-duration: 2s;
-o-transition-property: background-color,border;
-o-transition-duration: 2s;
}
Example 3

Transition example

/* with seven properties and delay */
#example3 {
padding: 15px;
background-color: #FF7CA6;
font-size: 16px;
width: 30%;
font-weight: bold;
color: #fff;
height: 20px;
-moz-transition-property: background-color,width,height,padding,font-size,color;
-moz-transition-duration: 1s;
-webkit-transition-property: background-color,width,height,padding,font-size,color;
-webkit-transition-duration: 1s;
-o-transition-property: background-color,width,height,padding,font-size,color;
-o-transition-duration: 1s;
}
#example3:hover {
background-color:#9c3;
width: 60%;
height: 60px;
padding: 50px;
font-size: 30px;
color: #FFFF00;
-moz-transition-property: background-color,width,height,padding,font-size,color;
-moz-transition-duration: 2s;
-webkit-transition-property: background-color,width,height,padding,font-size,color;
-webkit-transition-duration: 2s;
-o-transition-property: background-color,width,height,padding,font-size,color;
-o-transition-duration: 2s;
}
Example 4

Transition example

/* with all the properties simultaneously */
#example4 {
padding: 15px;
background-color: #9c3;
color: #fff;
font-size: 16px;
width: 30%;
font-weight: bold;
transition: all 2s;
-webkit-transition: all 2s;
}
#example4:hover {
background-color: #FF7CA6;
color: #242424;
width: 60%;
}
Final words:

- the transition declarations need to appear in the CSS. In Blogger, the CSS is located before ]]</b:skin>
- as you can see in the examples above, you can assign different rules for the transitions of different elements in a single rule - just separate them with commas.
- it is not mandatory to use the four properties in the transition declaration, but their order must always look like this: property/duration/timing-function/delay.
- the duration and delay values ​​must be expressed in seconds, but sometimes a second is a long time for a transition. In this case you can use values with milliseconds, for example, .5s means half a second.
- In small time intervals, the timing of the transition-function property does not give a remarkable effect being most useful only in more advanced animations. The possible values are either ease (the default, which makes the transition with a slow beginning, then gets faster and ends slowly), linear (the same transition speed from beginning to end), ease-in (transition begins slowly and then the speed increases), ease-out (transition starts fast and slows down at the end) and ease-in-out.

Share blog posts in social medias using Sharethis

In my opinion, AddThis is the most complete social sharing service allowing to share your posts in more than 270 different social networks. I use the AddThis widget, so if you would like to see a live demo, please scroll down to the buttom of this post to see the AddThis sharing buttons.


This tutorial will show you how to register and add this feature on your blog and you will get to know some of the customization options of these buttons. So let's get started!

Getting the AddThis share buttons code

Step 1. Visit the https://www.addthis.com/get/sharing page.
Step 2. To get the sharing buttons and to access the AddThis sharing stats to find out how many people shared your post by using the AddThis feature, click on the "Create account" button.

create addthis account

The site will ask you to make a small registration. Fill out the information to register. It's quick, simple and it's free. To finish the registration, click on the Register button.

register addthis

Step 3. After you've been logged in, right below the "Get sharing buttons for", choose the "A website" option.

addthis share buttons

Step 4. In the "Select style" section, choose the buttons style that you think would look the best on your site/blog. Please note that on the right side you can see a preview of these buttons.

addthis sharing buttons

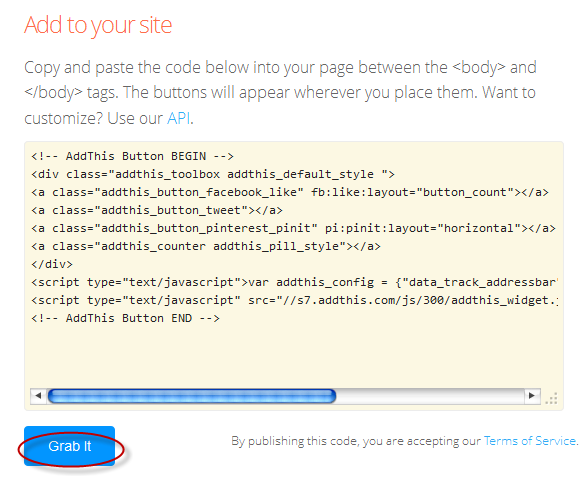
Step 5. After you have chosen the style, the site will provide a code - click on the "Grab it" button to copy it.

addthis code

The code provided will look like this:
<!-- AddThis Button BEGIN -->
<div class="addthis_toolbox addthis_default_style ">
<a class="addthis_button_facebook_like" fb:like:layout="button_count"></a>
<a class="addthis_button_tweet"></a>
<a class="addthis_button_pinterest_pinit" pi:pinit:layout="horizontal"></a>
<a class="addthis_counter addthis_pill_style"></a>
</div>
<script type="text/javascript">var addthis_config = {"data_track_addressbar":true};</script>
<script type="text/javascript" src="//s7.addthis.com/js/300/addthis_widget.js#pubid=ra-XXXXXXXXXXX"></script>
<!-- AddThis Button END -->

Now that you have selected and set up your AddThis sharing buttons, it is recommended to add them in the footer of your posts...

Adding the AddThis sharing buttons on Blogger

Step 1. Access your Blogger Dashboard and go to Template, then click on the Edit HTML button on the right:

blogger template

Step 2. Click anywhere inside the code area and press the CTRL + F keys to open the search box.

Step 3. Type the following line inside the search box and hit Enter to find it:
<div class='post-footer'> 
Step 4. Just above this line, add the code for the AddThis social sharing buttons.

Note: If you want to add at the beginning of your posts, add the code below the second <div class='post-header'>

Adding more buttons

To add more buttons, simply choose the button for that social network and add the code just above the </div> tag (see step 5 above).

Some examples:
<a class="addthis_button_linkedin"></a> /* linkedin button */
<a class="addthis_button_google_plusone" g:plusone:size="medium"></a> /*gplus button */
<a class="addthis_button_digg"></a> /* digg button */
<a class="addthis_button_stumbleupon"></a> /* stumbleupon button */
<a class="addthis_button_print"></a> /* print button */

CSS3 AddThis Share Buttons

You can add just a single button, so that when the reader hover over it, a menu will open with the options of social networks to share the post.

css3 share buttons, addthis

Visit this page for a demo.

Step 1. Go to Template > click on the Edit HTML button > press the CTRL + F keys and search for the <div class='post-footer'> line. Just above this line, paste the following code:
<style type='text/css'>
.addthis_share_btn a, .addthis_share_btn a:visited {
background: #FF5C00; /* background color of the button */
display: inline-block;
padding: 6px 12px;
font-family: arial,helvetica,lucida,verdana,sans-serif;
font-size: 12px;
line-height: 1em;
color: #fff;
text-decoration: none;
-moz-border-radius: 5px;
-webkit-border-radius: 5px;
-moz-box-shadow: 0 1px 3px rgba(0,0,0,0.5);
-webkit-box-shadow: 0 1px 3px rgba(0,0,0,0.5);
border-radius: 5px;
box-shadow: 0 1px 3px rgba(0,0,0,0.5);
text-shadow: 0 -1px 1px rgba(0,0,0,0.25);
border-bottom: 1px solid rgba(0,0,0,0.25);
position: relative;
cursor: pointer;
}
.addthis_share_btn a:hover {
background: #D45500; /* background color on mouse hover */
color: #fff;
}
.addthis_share_btn a:active { top: 1px; }

.addthis_share_btn a span, .addthis_share_btn:visited a span {
background: url(http://www.addthis.com/cms-content/images/gallery/icon-addthis.gif) no-repeat left;
padding: 1px 0 1px 18px;
}
</style>
<!-- AddThis Share Button -->
<div class='addthis_toolbox addthis_share_btn'>
<a class='addthis_button_compact' href='http://addthis.com/bookmark.php'>
<span>Share</span></a>
</div>
<script src='http://s7.addthis.com/js/250/addthis_widget.js' type='text/javascript'/>
<!-- End AddThis Share Button -->
Customization

- To change the color of the button according to the colors of your template, modify the color value in red.
- If you want to change the "Share" text, replace the text in blue.

Step 2. Save the changes by clicking on the Save template button and you're done!

How to Add Neat CSS3 Dropdown Menu in Blogger

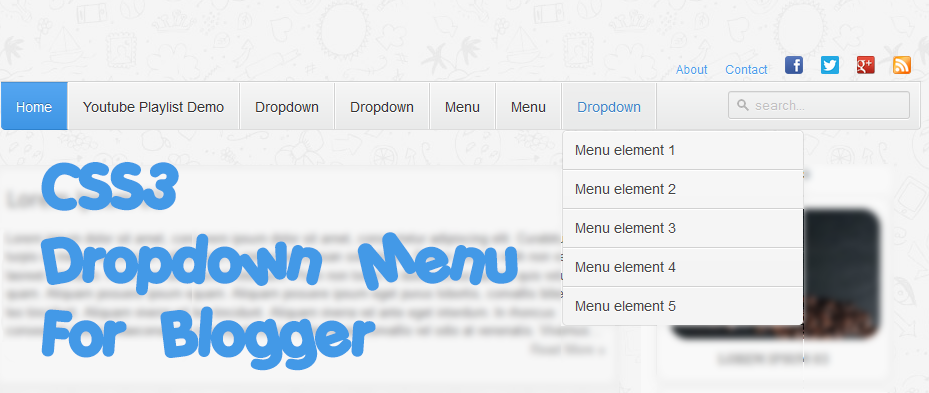
Here's another simple yet amazing dropdown menu with pure CSS3 made by Andrew from script-tutorials.com to which I have made some slight modifications so that it could easily adapt in our Blogger template.

In the upper right corner of this menu we have the contact links and the social media icons for Facebook, Twitter, Google Plus and RSS feed. Below these links, we have the drop-down navigation menu and on the left side, the search form.
To achieve better user interface and interaction, the CSS dropdown menu features sub categories that appear with a nice touch of CSS3 box-shadow, text-shadow and a cool transition once the parent link is activated by a hover.

dropdown menu

Please visit this demo page to see it in action.

Adding the CSS dropdown navigation menu in Blogger

Step 1. Access your Blogger Dashboard and go to Template > click on the Edit HTML button


Step 2. Click anywhere inside the code area and press the CTRL + F keys to open the search box. Type the tag below inside the search box and hit Enter to find it.
</header>
Step 3. Just below </header> add the HTML structure:
<div id='contact-links'>
    <div id='my-links'>
        <a href='#'>About</a>
        <a href='#'>Contact</a>
                <a href='#'><img height='18px' src='http://3.bp.blogspot.com/-bsoTf8EpVbE/Uw_W2HmlPOI/AAAAAAAAGXQ/RS57fNXl1tE/s1600/facebook-icon.png' title='Facebook' width='18px'/></a>
<a href='#'><img height='18px' src='http://2.bp.blogspot.com/-9OXxCWCilgM/Uw_WNEqUShI/AAAAAAAAGXI/2T6Dc8zVrxA/s1600/twitter.png' title='Twitter' width='18px' /></a>
        <a href='#'><img height='18px' src='http://3.bp.blogspot.com/-LQABZjrBgiY/Uw_X4zGqixI/AAAAAAAAGXo/jlR7r1blHso/s1600/google-plus-icon.png' title='Google' width='18px'/></a>
        <a href='#'><img height='18px' src='http://1.bp.blogspot.com/-NsPs8DRJfP4/Uw_XnNMAHTI/AAAAAAAAGXg/qC2kA_T-BdY/s1600/rss-icon.png' title='RSS Feed' width='18px'/></a>
    </div>

    <div id='menu-container'>
        <nav id='neat-menu'>
            <ul>
              <li class='active'><a href='/'>Home</a></li>
                <li><a href='#'>Dropdown</a>
                    <ul>
                        <li><a href='#'>Menu element 1</a></li>
                        <li><a href='#'>Menu element 2</a></li>
                        <li><a href='#'>Menu element 3</a></li>
                        <li><a href='#'>Menu element 4</a></li>
                        <li><a href='#'>Menu element 5</a></li>
                    </ul>
                </li>
                <li><a href='#'>Single Menu</a></li>
                <li><a href='#'>Single Menu</a></li>
                <li><a href='#'>Dropdown</a>
                    <ul>
                        <li><a href='#'>Menu element 1</a></li>
                        <li><a href='#'>Menu element 2</a></li>
                        <li><a href='#'>Menu element 3</a></li>
                        <li><a href='#'>Menu element 4</a></li>
                        <li><a href='#'>Menu element 5</a></li>
                    </ul>
                </li>
            </ul>
        </nav>

        <!-- menu-search form -->
        <div id='menu-search'>
          <form method='get' action='/search'>
                <input autocomplete='off' name='q' placeholder='search...' type='text' value=''/>
            </form>
        </div>
    </div>
</div>
Replace the # symbols with the URLs of your links and replace the texts in blue with the titles that you want to appear. To change the social media icons, add the links of your icons instead of the ones in blue.

If you want to remove the sub categories, remove the code within the tags highlighted in yellow, including the ul tags. To remove only a menu element, remove the part that starts with <li> and ends with </li>

Step 4. And now let's add the CSS styling for the menu. Search for the following piece of code:
]]></b:skin>
Just above ]]></b:skin> add this code:
#contact-links {
    text-shadow: 0 -1px 0 rgba(0, 0, 0, 0.3);
    margin: auto;
    position: relative;
    width: 100%;
}
#contact-links a {
    color: #4C9FEB;
}
#contact-links a:hover {
    color: #3D85C6;
}
#my-links {
    float: right;
    font-size: 12px;
    margin: 4px 10px;
    overflow: hidden;
    text-shadow: 0 1px 0 #FFFFFF;
}
#my-links a {
    margin-left: 7px;
    padding-left: 8px;
    text-decoration: none;
}
#my-links a:first-child {
    border-width: 0;
}
#menu-container {
    background: -webkit-linear-gradient(#f6f6f6, #e9eaea) repeat scroll 0 0 transparent;
    background: -moz-linear-gradient(#f6f6f6, #e9eaea) repeat scroll 0 0 transparent;
    background: linear-gradient(#f6f6f6, #e9eaea) repeat scroll 0 0 transparent;
    filter: progid:DXImageTransform.Microsoft.gradient( startColorstr='#f6f6f6', endColorstr='#e9eaea',GradientType=0 );
    border-radius: 0 0 4px 4px;
border:1px solid rgba(0,0,0,0.1);
    box-shadow: -1px 1px 0 rgba(255, 255, 255, 0.8) inset;
    clear: both;
    height: 46px;
    padding-top: 1px;
}
#neat-menu {
    float: left;
}
#neat-menu a {
    text-decoration: none;
}
#neat-menu ul {
    list-style: none;
    margin: 0;
    padding: 0;
}
#neat-menu > ul > li {
    float: left;
    padding-bottom: 12px;
}
#neat-menu ul li a {
    box-shadow: -1px 0 0 rgba(255, 255, 255, 0.8) inset, 1px 0 0 rgba(255, 255, 255, 0.8) inset;
    border-color: #D1D1D1;
    border-image: none;
    border-style: solid;
    border-width: 0 1px 0 0;
    color: #333333;
    display: block;
    font-size: 14px;
    height: 25px;
    line-height: 25px;
    padding: 11px 15px 10px;
    text-shadow: 0 1px 0 #FFFFFF;
}
#neat-menu ul li a:hover {
background: -webkit-linear-gradient(#efefef, #e9eaea) repeat scroll 0 0 transparent;
    background: -moz-linear-gradient(#efefef, #e9eaea) repeat scroll 0 0 transparent;
    background: linear-gradient(#efefef, #e9eaea) repeat scroll 0 0 transparent;
    filter: progid:DXImageTransform.Microsoft.gradient( startColorstr='#efefef', endColorstr='#e9eaea',GradientType=0 );
}
#neat-menu > ul > li.active > a {
    background: -webkit-linear-gradient(#55A6F1, #3F96E5) repeat scroll 0 0 transparent;
    background: -moz-linear-gradient(#55A6F1, #3F96E5) repeat scroll 0 0 transparent;
    background: linear-gradient(#55A6F1, #3F96E5) repeat scroll 0 0 transparent;
    filter: progid:DXImageTransform.Microsoft.gradient( startColorstr='#55A6F1', endColorstr='#3F96E5',GradientType=0 );
    border-bottom: 1px solid #2D81CC;
    border-top: 1px solid #4791D6;
    box-shadow: -1px 0 0 #55A6F1 inset, 1px 0 0 #55A6F1 inset;
    color: #FFFFFF;
    margin: -1px 0 -1px -1px;
    text-shadow: 0 -1px 0 rgba(0, 0, 0, 0.3);
}
#neat-menu > ul > li.active > a:hover {
    background: -webkit-linear-gradient(#499FEE, #3F96E5) repeat scroll 0 0 transparent;
    background: -moz-linear-gradient(#499FEE, #3F96E5) repeat scroll 0 0 transparent;
    background: linear-gradient(#499FEE, #3F96E5) repeat scroll 0 0 transparent;
    filter: progid:DXImageTransform.Microsoft.gradient( startColorstr='#499FEE', endColorstr='#3F96E5',GradientType=0 );
}
#neat-menu > ul > li:first-child > a {
    border-radius: 0 0 0 5px;
}
#neat-menu ul ul {
    background: -webkit-linear-gradient(#F7F7F7, #F4F4F4) repeat scroll 0 0 padding-box transparent;
    background: -moz-linear-gradient(#F7F7F7, #F4F4F4) repeat scroll 0 0 padding-box transparent;
    background: linear-gradient(#F7F7F7, #F4F4F4) repeat scroll 0 0 padding-box transparent;
    filter: progid:DXImageTransform.Microsoft.gradient( startColorstr='#F7F7F7', endColorstr='#F4F4F4',GradientType=0 );
    border-radius: 5px 5px 5px 5px;
    border: 1px solid rgba(0, 0, 0, 0.1);
    box-shadow: 0 1px 0 #FFFFFF inset;
    height: 0;
    margin-top: 1px;
    opacity: 0;
    overflow: hidden;
    width: 240px;
    padding: 0;
    position: absolute;
    visibility: hidden;
    z-index: 1;
    -webkit-transition: all .5s;
    -moz-transition: all .5s;
    -ms-transition: all .5s;
    -o-transition: all .5s;
    transition: all .5s;
}
#neat-menu ul li:hover ul  {
    margin-top: 0\2;
    height: auto;
    opacity: 1;
    visibility: visible;
}
#neat-menu ul ul a {
    border-right-width: 0;
    border-top: 1px solid #D1D1D1;
    box-shadow: 0 1px 0 #FFFFFF inset;
    color: #444444;
    height: 24px;
    line-height: 24px;
    padding: 7px 12px;
    text-shadow: 0 1px 0 #FFFFFF;
}
#neat-menu ul ul a:hover {
background: -webkit-linear-gradient(#55A6F1, #3F96E5) repeat scroll 0 0 transparent;
    background: -moz-linear-gradient(#55A6F1, #3F96E5) repeat scroll 0 0 transparent;
    background: linear-gradient(#55A6F1, #3F96E5) repeat scroll 0 0 transparent;
    filter: progid:DXImageTransform.Microsoft.gradient( startColorstr='#55A6F1', endColorstr='#3F96E5',GradientType=0 );
    border-top: 1px solid #4791D6;
    box-shadow: -1px 0 0 #55A6F1 inset, 1px 0 0 #55A6F1 inset;
    color: #FFFFFF;
    text-shadow: 0 -1px 0 rgba(0, 0, 0, 0.3);
}
#neat-menu ul ul li:first-child a {
    border-top-width: 0;
}
#menu-search {
    margin:8px 10px 0 0;
    float: right;
}
#menu-search form {
    background: url("http://1.bp.blogspot.com/-NzU9je1udG4/Uw-1tZku4eI/AAAAAAAAGWs/-h4BU1mFTiU/s1600/menu-search.gif") no-repeat scroll 5% 50% transparent;
    border: 1px solid #CCCCCC;
    border-radius: 3px 3px 3px 3px;
    box-shadow: 0 1px 0 rgba(0, 0, 0, 0.05) inset, 0 1px 0 #FFFFFF;
    height: 26px;
    padding: 0 25px;
    position: relative;
    width: 130px;
}
#menu-search form:hover {
    background-color: #F9F9F9;
}
#menu-search form input {
    color: #999999;
    font-size: 13px;
    height: 26px;
    text-shadow: 0 1px 0 #FFFFFF;
    background: none repeat scroll 0 0 transparent;
    border: medium none;
    float: left;
    outline: medium none;
    padding: 0;
    width: 100%;
}
#menu-search form input.placeholder, #menu-search form input:-moz-placeholder {
    color: #C4C4C4;
}
Step 5. Click on the Save template button to save the changes... and you're done! ;)

I hope you like this CSS3 dropdown menu and if you enjoyed this tutorial, please share and subscribe.

Understanding the Page Elements of a Blogger Layout

When following a tutorial to add a gadget/widget or make some customizations in a Blogger blog, some new users may not know the meaning of certain terms, and sometimes, it may be harder to locate them. As for the gadgets, usually it is required to access the blog's layout in order to add or arrange any of the page elements.

For a better understanding, here are some basic explanations about the Page Elements located in the Layout section of a Blogger dashboard.

What are the Page Elements?

Page Elements is, basically, the body of our blog. To access the Page Elements, we need to click on the "Layout" option in the Blogger dashboard.


Understanding the Page Elements sections

The Blogger Layout is made of "sections and elements". The sections mark certain areas of a page. Every section is represented by the tag <b:section> and has an unique "ID" that names its element which is followed by a "class" tag. Each section has some attributes and through these, we can determine the number of elements allowed in the section and if this section gives the option to add a "page element".


Let's take a look to an example of the default code related to the header section found in the HTML of a Blogger template:
<b:section class='header' id='header' maxwidgets='1' showaddelement='no'>
<-- rest of the code -->
</b:section>
Breaking apart the code above:
  1. <b:section is the opening tag of the section.
  2. class='header' - describes the existing group inside the "header" element
  3. id='header' - identifies and specifies the header as a single element.
  4. maxwidgets='1' - determines the number of elements allowed in the "header"; here we have the number of gadgets that we can include in the header section. In this example, '1' means that this section allows us to add only a gadget.
  5. showaddelement='no' - the 'no' attribute means that the header will not show the "Add a gadget" link or we won't be able to move any Page Elements. To activate this option so that we can add new Page Elements (Add a gadget), we should change 'no' to 'yes'. By setting the "showaddelement" attribute to 'yes', we'll be able to arrange the elements as we like, just click on the element that you want to move and drag & drop it wherever you want.
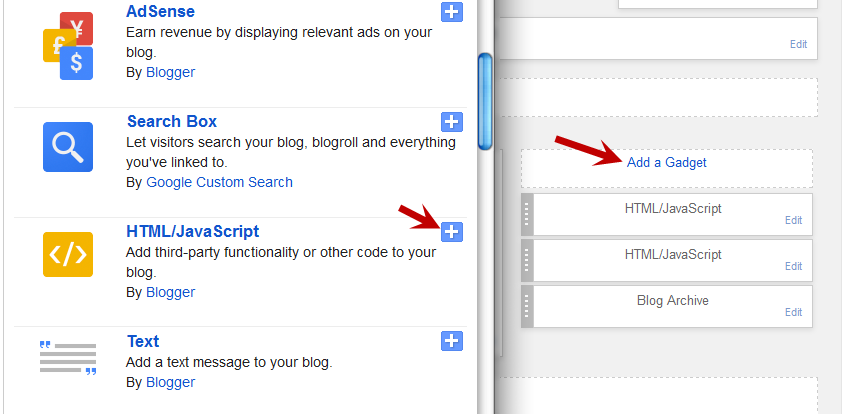
The spaces reserved for adding elements in the existing sections are called Gadgets (or Widgets). You can easily add various Page Elements by clicking "Add a Gadget" link. This will open a pop-up window for you to pick and choose which elements should be added. Click on the Gadget's title or on the blue plus sign symbol to add it to your blog's layout.


After you have added a page element, gadgets can be moved up, down or sideways. You can put them wherever you want. Of all the existing gadgets, the most used is the "HTML/JavaScript". Inside this gadget (widget) you can insert any code, as long as it is in the HTML or JavaScript language.

Each time you decide to add a new gadget, click on the "Add a gadget" link in the area where you want to add it. For example, if you want to add a JavaScript code and want it to appear in the sidebar, you should click on the "Add a gadget" in the "sidebar" section, choose the "HTML/JavaScript" option and paste the code in there.

Once you have added new gadgets (widgets), it is recommended to check the changes by clicking on the Preview button before saving anything. So, if something went wrong, you simply click on "Clear" so that everything that was not saved to return to its previous state. If the position of any Page Elements (Gadgets) has been rearranged, you will need to click on the Save arrangement button in order to see the changes.
 
Visit : GeeP.in: Odia Songs | Your Link Here | Your Link Here
Copyright © 2014. Free India Tips! Daily Full Update expert Advice for your life style - All Rights Reserved
Template Created by Shary Adapted from Maskolis
Proudly powered by Blogger